Many of you know me as a knifemaker. I’ve shared with you my leatherwork for knives, small wallets, and even custom sheaths for lighters. But my passion for craftsmanship doesn’t stop there—I love exploring new projects and materials. My latest passion? Creating handmade journaling notebooks through traditional bookbinding.
I not only make knives, but I like to try out many different kinds of handcrafting. Learn more about my handmade notebooks and how I make these neat little daily companions for your pocket. Turn them into your own, take notes, write a diary, or turn them into your own daily journal.
My Signature knife was the first knife I ever made, and it is still my companion on my journeys and my EDC. But I wanted to take it to the next level and bring in new elements I learned over the years
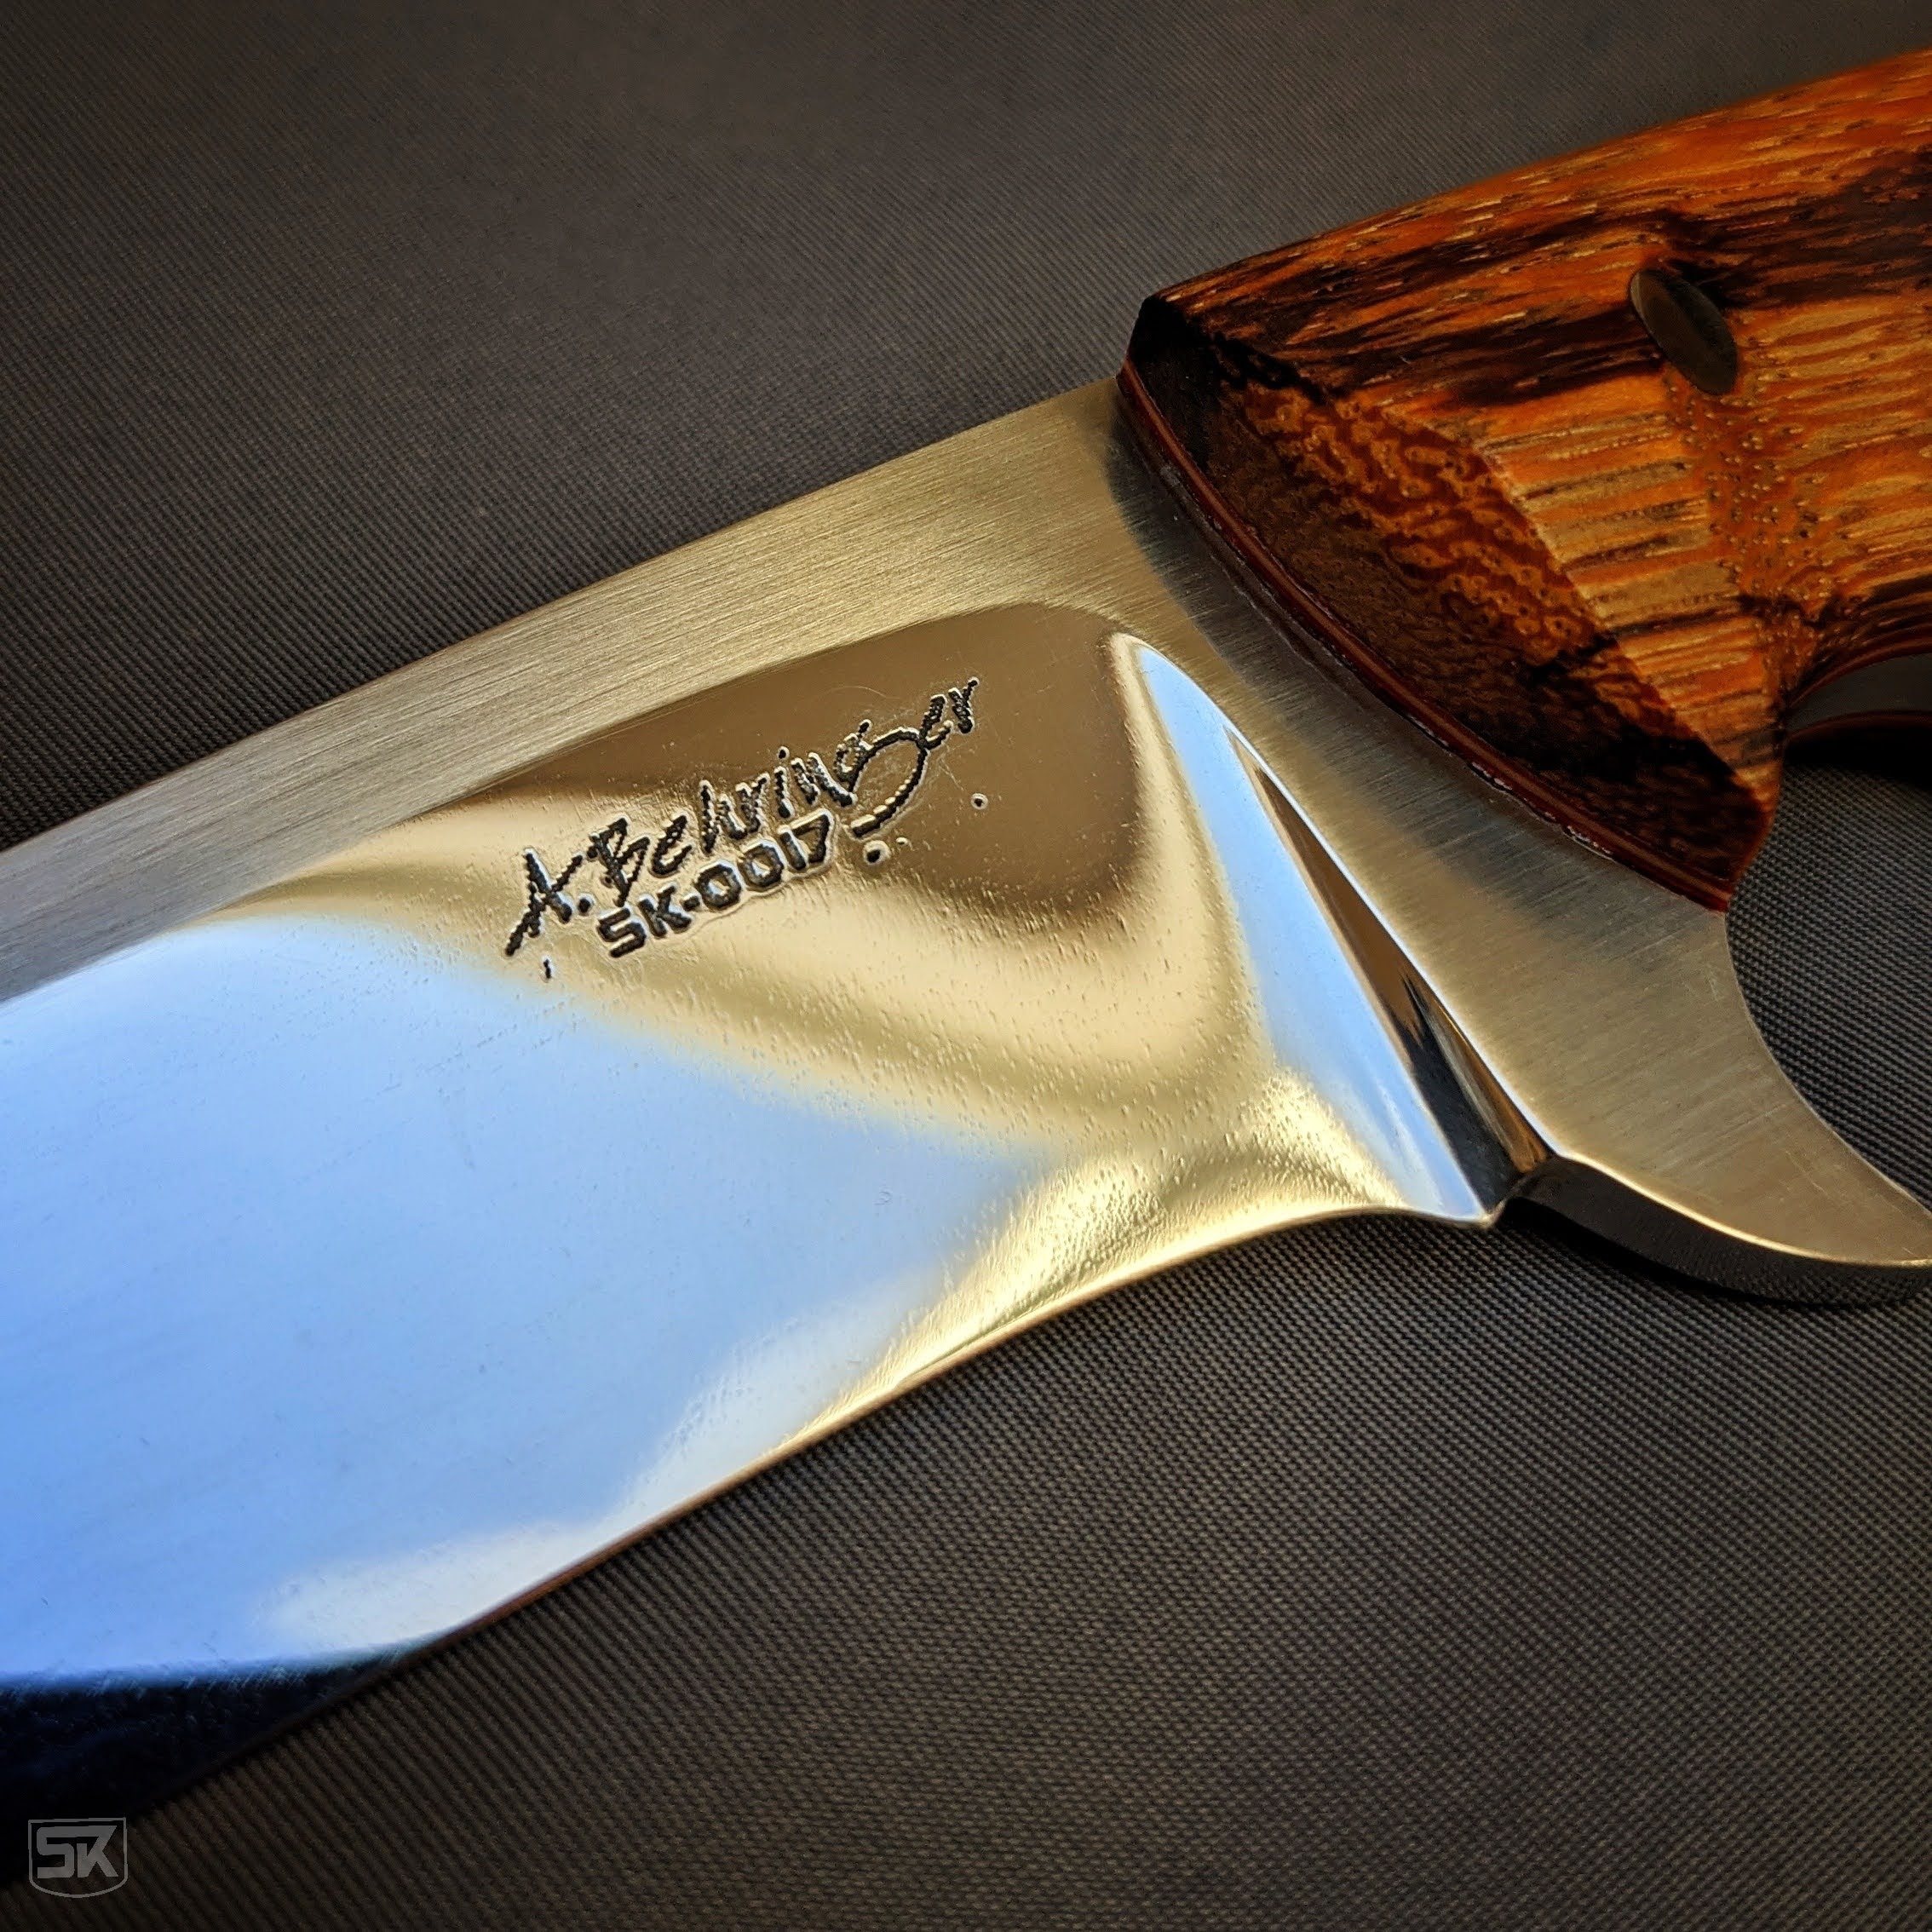
This project caught me as soon as I understood what the goal was. A father contacted me with the idea to build a custom-designed Bowie knife for the eighteenth birthday of his son. With the idea that it will become a future family heirloom.
With every knife I made I learned one or two new things. With this Kopis build, I aimed for: “let’s try what I can do at max without limits” and trying all the stuff I had on my list for future builds.
I had seen some ancient Kopis swords in pictures and similar to the Kukri III I wanted to make a smaller knife version of it. Again I also decided to give it a modern look. The blade was designed and I pushed myself to even try a hollow grind, freehand on a big recurved blade – yeah, why not try something easier first? It came out a bit uneven and I hoped to compensate for that during hand-sanding. As this knife should become my actual masterpiece I was expecting hours of hand-sanding anyway.
The handle should be also a new technique and I chose to do a frame handle I never did before. As Kopis swords are from ancient greece, I found nice curly olive wood to fit pretty well. As a contrast, the frame should be done out of ebony wood and some veneer liners. The handle itself would consist out of 12 parts that had to fit perfectly to get the final flush results. Everything was sanded on a flat surface to have perfectly flat sides.
I brought the blade to an 800 grit surface pre-heat treatment. I mixed my top-secret special Hamon creating Japanese ancient clay (my grand grandfathers preserved the secret mixture for generations) with water and brought my signature pattern on the blade and let it dry overnight.
The blade – ground to a thin hollow grind – plus the clay for selective hardening led to a serious issue after I dunked the glowing steel into the oil. The steel hardened nicely but I had a really serious warp in the blade – or to better describe it: The edge was wobbly like corrugated sheet metal. No way I could straighten that – only option: reshape the blade. Fortunately the blade was wide enough, even a bit wider than initially designed. And after some more hours of hand-sanding i had a blade that looked better than before.
I also needed to work on the guard piece – also a first-timer: I needed to hot form some steel. I needed more bend than I could archive by just taking away material. And I needed a suiting tailpiece for the handle too, that resembles the form of the front guard.
The blade went up the grit scale from 80, 120, 180 up to 1200 and then on the polishing wheel as I wanted blade, guard, and tailpiece at a perfect nice mirror finish.
I wanted to try something special and etch ornaments or something with meaning into it for the front guard. I went for the Latin words: “Memento Moris – Mors Certa Hora Incerta”. Translated that means “Remember that you are mortal – Death is certain, the time is uncertain”. First I thought about some more etching on the blade but I do not want to overdo the whole piece – especially after I already put so many hours into this knife. But these words are perfect for a knife.
So finally it was time to glue all up and move on the handle shaping. The tailpiece would be the last and glued on in a separate step. Handle shaping went pretty smooth but then I discovered one of the hardest challenges. The tang sticks out from the bottom of the handle And I need to get all the surface around it perfectly flat. That alone took some hours of scratching tiny parts of wood off, just with the tip of the file. I will need to come up with a better idea if I do this kind of handle again – Probably, that I can take the handle off until final assembly.
The last step was to weld the tailpiece to the tiny tip of the tang that stuck out. I am not a welder, I am far from good. So I managed to weld the two pieces but did not manage to get it perfectly and so that it is invisible after grinding, sanding, and polishing the bottom part. You can now see where the two pieces are put together. I am still thinking about trying to weld over it to close the spots – but I am hesitant as it might ruin the knife.
I am working on my first folding knife model. And to make the challenge complete I am trying to build a spring folder where a spring holds the blade in the opened or closed position (like the swiss army knives are made).
The most complicated part is, that all pieces have to fit together very precisely. The spring should not be too strong nor so weak, that the blade is able to wiggle around. This would also be a safety issue. Nobody wants to have a super sharp knife that could open while in the pocket. If the spring is too strong the risk is to slip when you try to close the knife and too much force is needed.
The axis and the connection points have to be set up very precisely. I feel like a clockmaker with fine files and sandpaper, tidying the friction parts up and even polishing them, so they do not scratch in the movement.
Work in progress
I had to experiment with the spring part. It is spacer and spring in one piece and I built it in a way, that the edge of the blade does not touch any internal parts of the handle when closed, so it remains sharp and smooth.
I had to experiment with the heat treatment for springs. I did not find good information on how to do this correctly. The first one was still too brittle and I snapped it and had to build a new one from scratch. When the steel is too soft it just bends and stays in that position. The spring loses all strength after opening and closing the knife after three or four times. In the end, I had a good resistance in the spring and it returns back to position every time.
The finished knife
The liner is a mixed material self-made Micarta. It consists of laminated gray paper and a layer of pear veneer. As all layers are drenched in laminating epoxy it is a waterproof and very stable material mix with a nice optical effect.
For the handle, I chose Padouk wood, a very nice and easy to work with material. It has good material properties and a coarse porous texture – The only thing was that it covered my whole workshop with a red layer of dust.
The etching says “spring folder” but the font I chose did not come out as expected, so next time I will choose a better-to-read font.
Another first-time was the use of my new polishing machine. That thing is kind of scary with the high speed and power. But it gets the polishing job done very nicely and it is so much more convenient instead of using a polishing wheel on my drill stand.
I am very happy with the results of my first ever made folding knife. I learned a lot – like always – and I can improve on that experiences for the next models.
I have recently finished more kitchen knives. I worked on another Japan-style Furutsu petty knife and a Chinese chef’s knife.
I used 2 mm O1 steel for these knives as this gives a good mix of stability, flexibility and thin enough to be highly sharpened. O1 is my favorite steel to work with.
On my last order of handle material, I changed the supplier and checked out some of his materials. I found that he offered bamboo handle scales and as I already planned to do Asian-style knives I found them to fit perfectly and got two sets. The bamboo is not a solid block but more layered or stacked. I still like it a lot.
My first tries to add a Hamon
I always try to learn something new – this time I wanted to experiment with creating selective hardness in the blades and a Hamon. A Hamon is a wavy line between the hardened part of the blade – the cutting edge – and the spine of the blade, where the steel stays softer. The advantage is, that the hardened blade is supported by a softer part of the blade which results in a more stable knife – and to be honest: it looks just super cool.
To create the Hamon I prepared the blades as usual and then I created a mix of ash and clay. The recipe for the exact mixtures is a secret that is passed from generation to generation in our family. The clay is left to dry. Then the blade is heated together with the clay mantle and hardened in the oil.
After hardening the clay is removed and the blade is tempered and then hand sanded to the desired grit and then etched in ferric chloride, then sanded again. I repeated the etching and sanding process multiple times to reach the desired look.
For my first try I am very happy with the result. Must be due to the secret clay recipe of our family 🙂
I work on my own in my tiny workshop, that is what I usually do. But when a friend of mine called and told me that he knows somebody who would love to learn how to make a knife, I thought: why not give it a try. I had no idea what to charge for that, as I wouldn’t do it for the money anyway. So I just said a bit more than the material for a knife would cost.
So I met Arne – an eighteen-year-old guy, polite, friendly, and respectful – and very eager to learn the skills needed to make a knife. And what matters most: the ability to listen and learn.
He wanted to do a Santoku-style kitchen knife, similar to the chef’s knife I made. But he absolutely wanted to do a hidden tang knife – no matter how much I said that this would mean a lot more and complicated work for his first knife. But as he wants to give it a try we absolutely followed his decision.
We drafted his blade on a piece of paper on his first visit and I just added some tips on ergonomics and basic needs of a good cutting blade. Then I asked him to transfer that drawing onto the computer.
On his next visit I helped him modify some details on the computer, printed out his design and he transferred the cutout paper stencil to the 2 mm O1 steel.
Then we started with the first “big machinery” ok, just my handy little angle grinder – not so big machinery. Arne cut out the steel blade while I showed him some tricks and tweaks on how to get convex and concave cuts done right.
I let him do all the steps himself, only the ones that had the potential to ruin the knife I just showed him how I do it.
For the handle material he got some nice cherry wood and for the front plate (guard/bolster part) I had a nice brass and paper micarta piece left from a previous project. We tried a new technique to slot the handle for the hidden tang: We drilled a hole into the handle and only had the bolster with a tight-fitting slot around the blade. The hole was filled up with epoxy during assembly and the plate serves as a nice-looking cap.
My student Arne shaping the form of the handle
The last thing to do was shaping the handle roughly with the band saw then going through rough grinding and finally hand sanding the wood into shape. The cherry wood is nice to hand sand to a satin shiny finish and the last step was to treat the handle well with Linseed oil varnish.
Arne did really good and the final product looks awesome. He can be really proud of his work and the knife which is a present for his father.
All photos with kind permission of Arne. Work was always with full compliance to Corona regulations
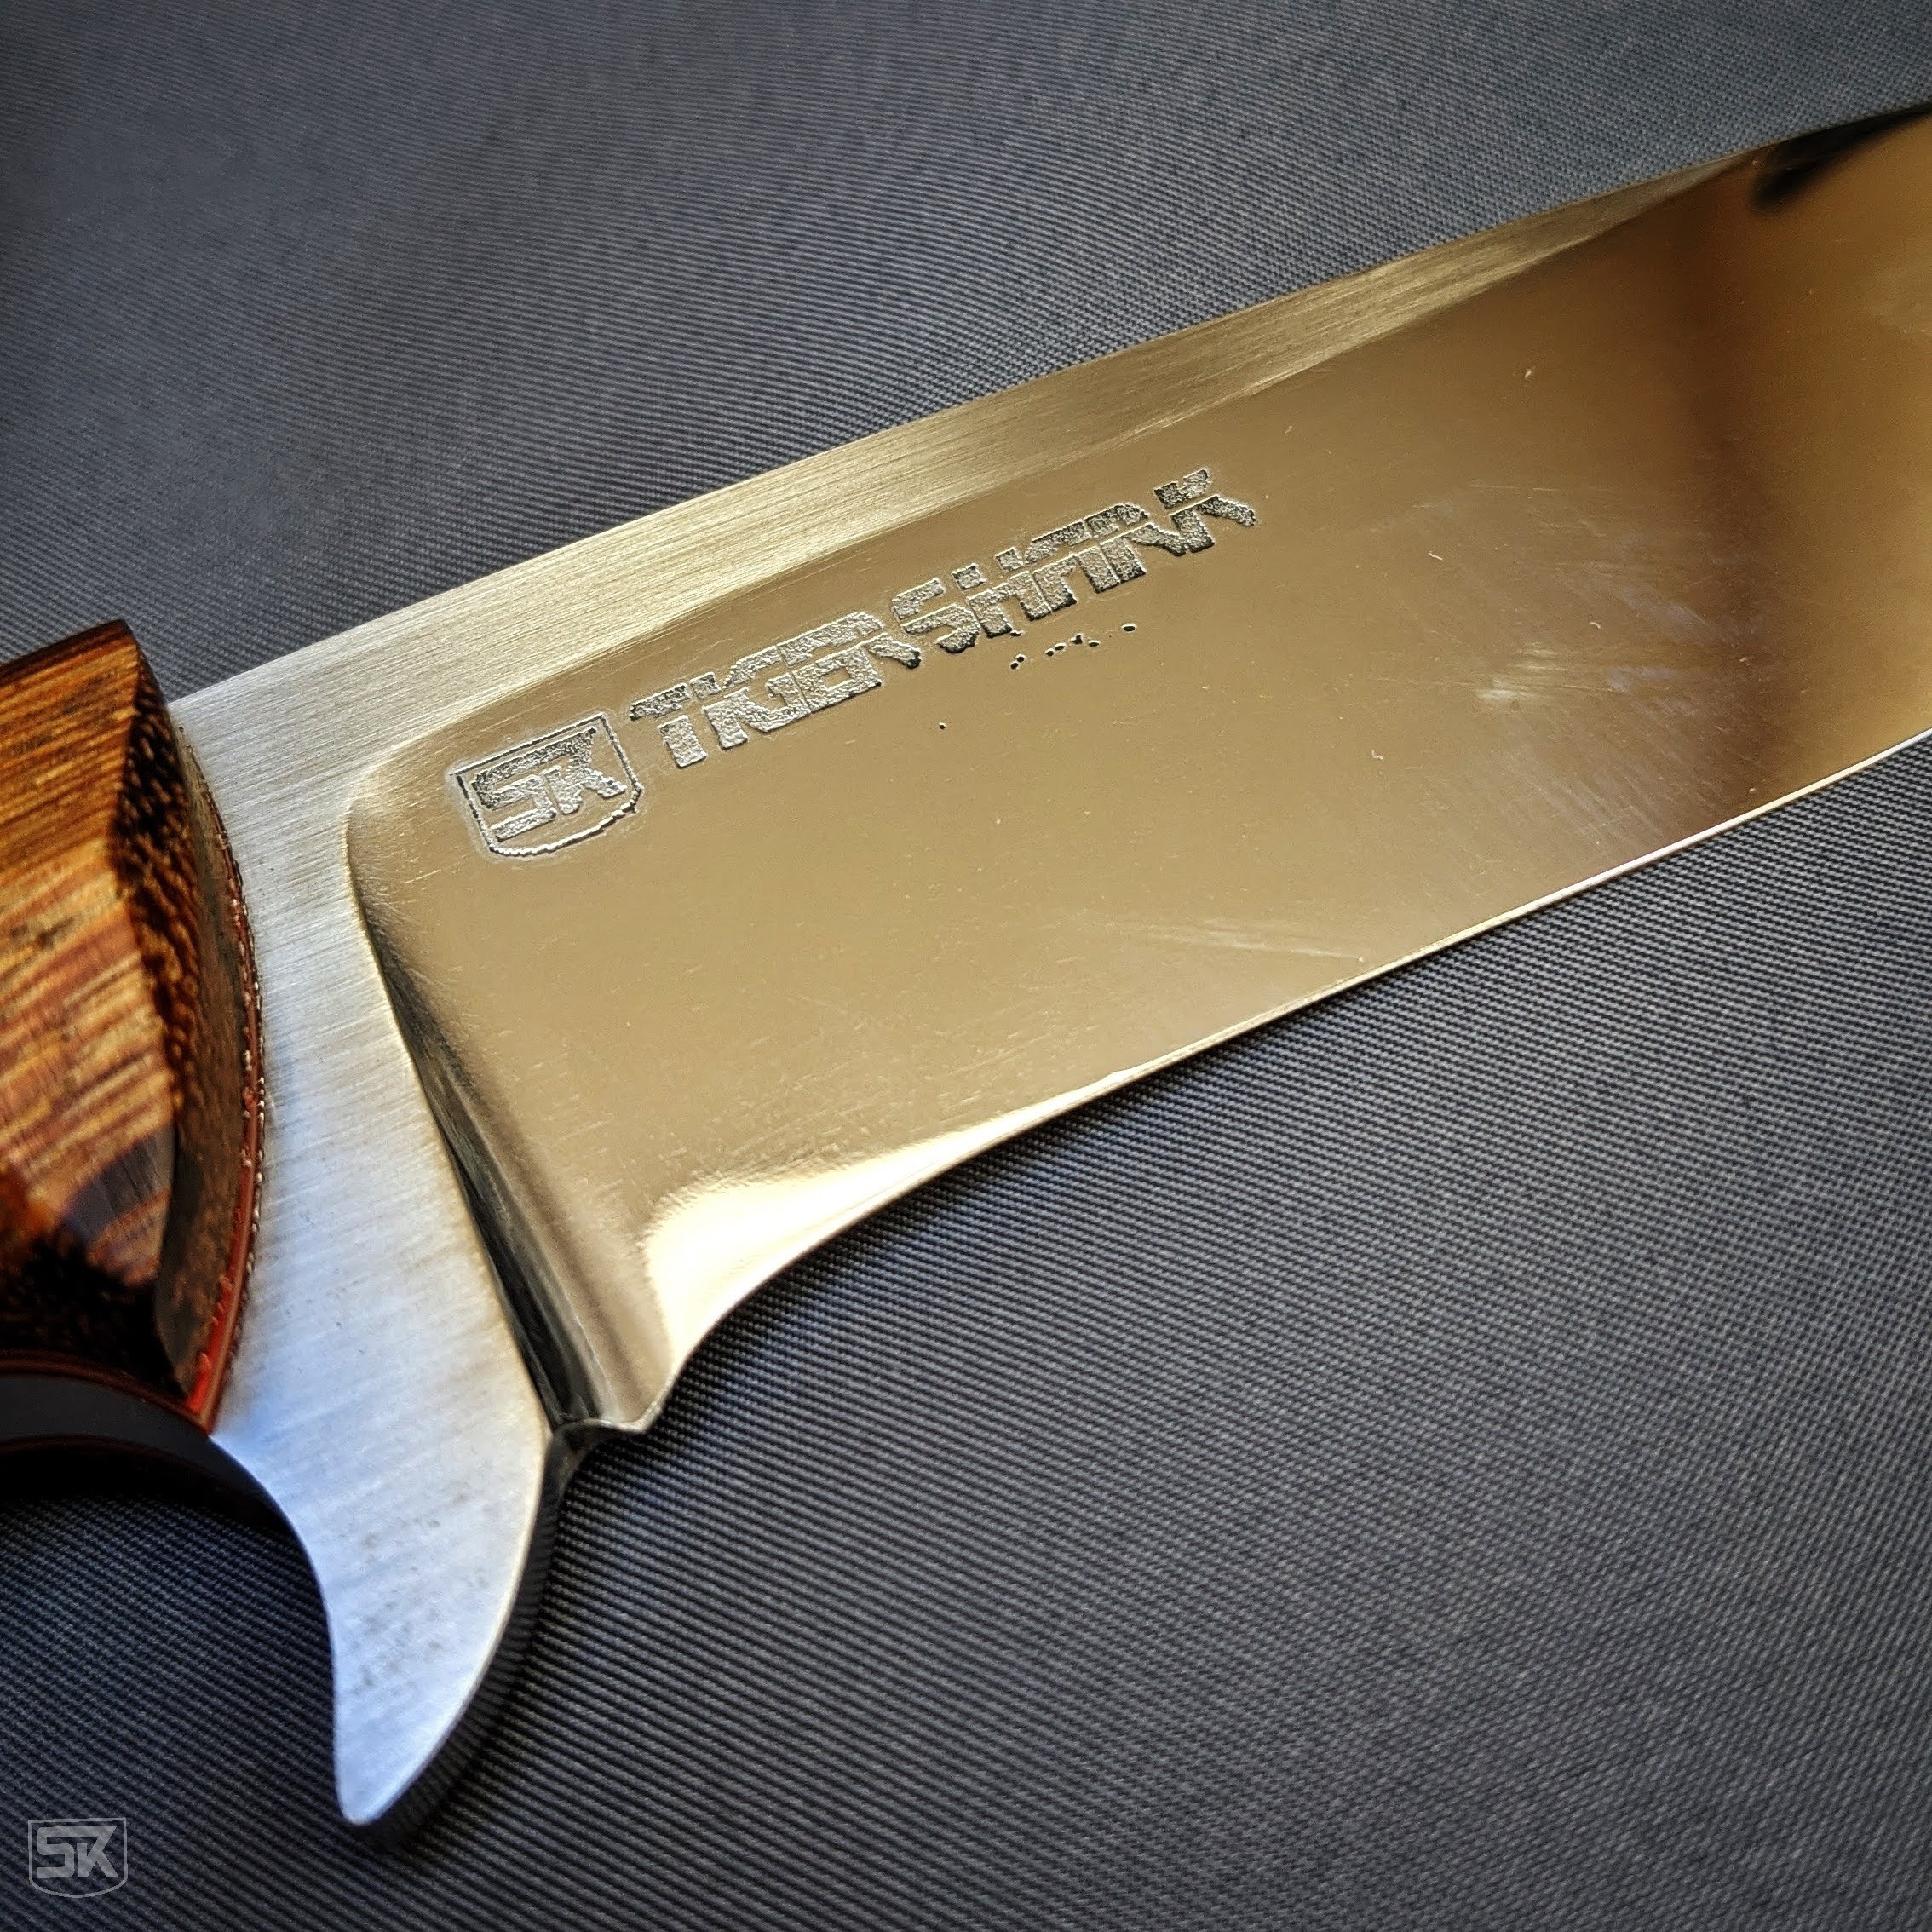
The first Tigershark knife I made might be the knife I learned the most from. I tried to do the final surface finish only on the belt grinder and failed miserably. The scratch pattern I got was way too uneven. Additionally, I etched the blade too early and ended with a partially ground out marking.
I used the belt grinder to put the secondary bevel on the blade as the first step of sharpening – I usually did that with diamond sharpeners by hand. The ultra-fine grit belt worked pretty well. It also was my first blade I sharpened with a leather strap and polish paste. That thing is razor-sharp now.
I always thought about if I want to sell the knife. I think it is one of my most beautiful designs with a nice handle and in the end, it is also a very practical knife. It has its small flaws and so it is still here and I am not sure if I want to keep it for me.
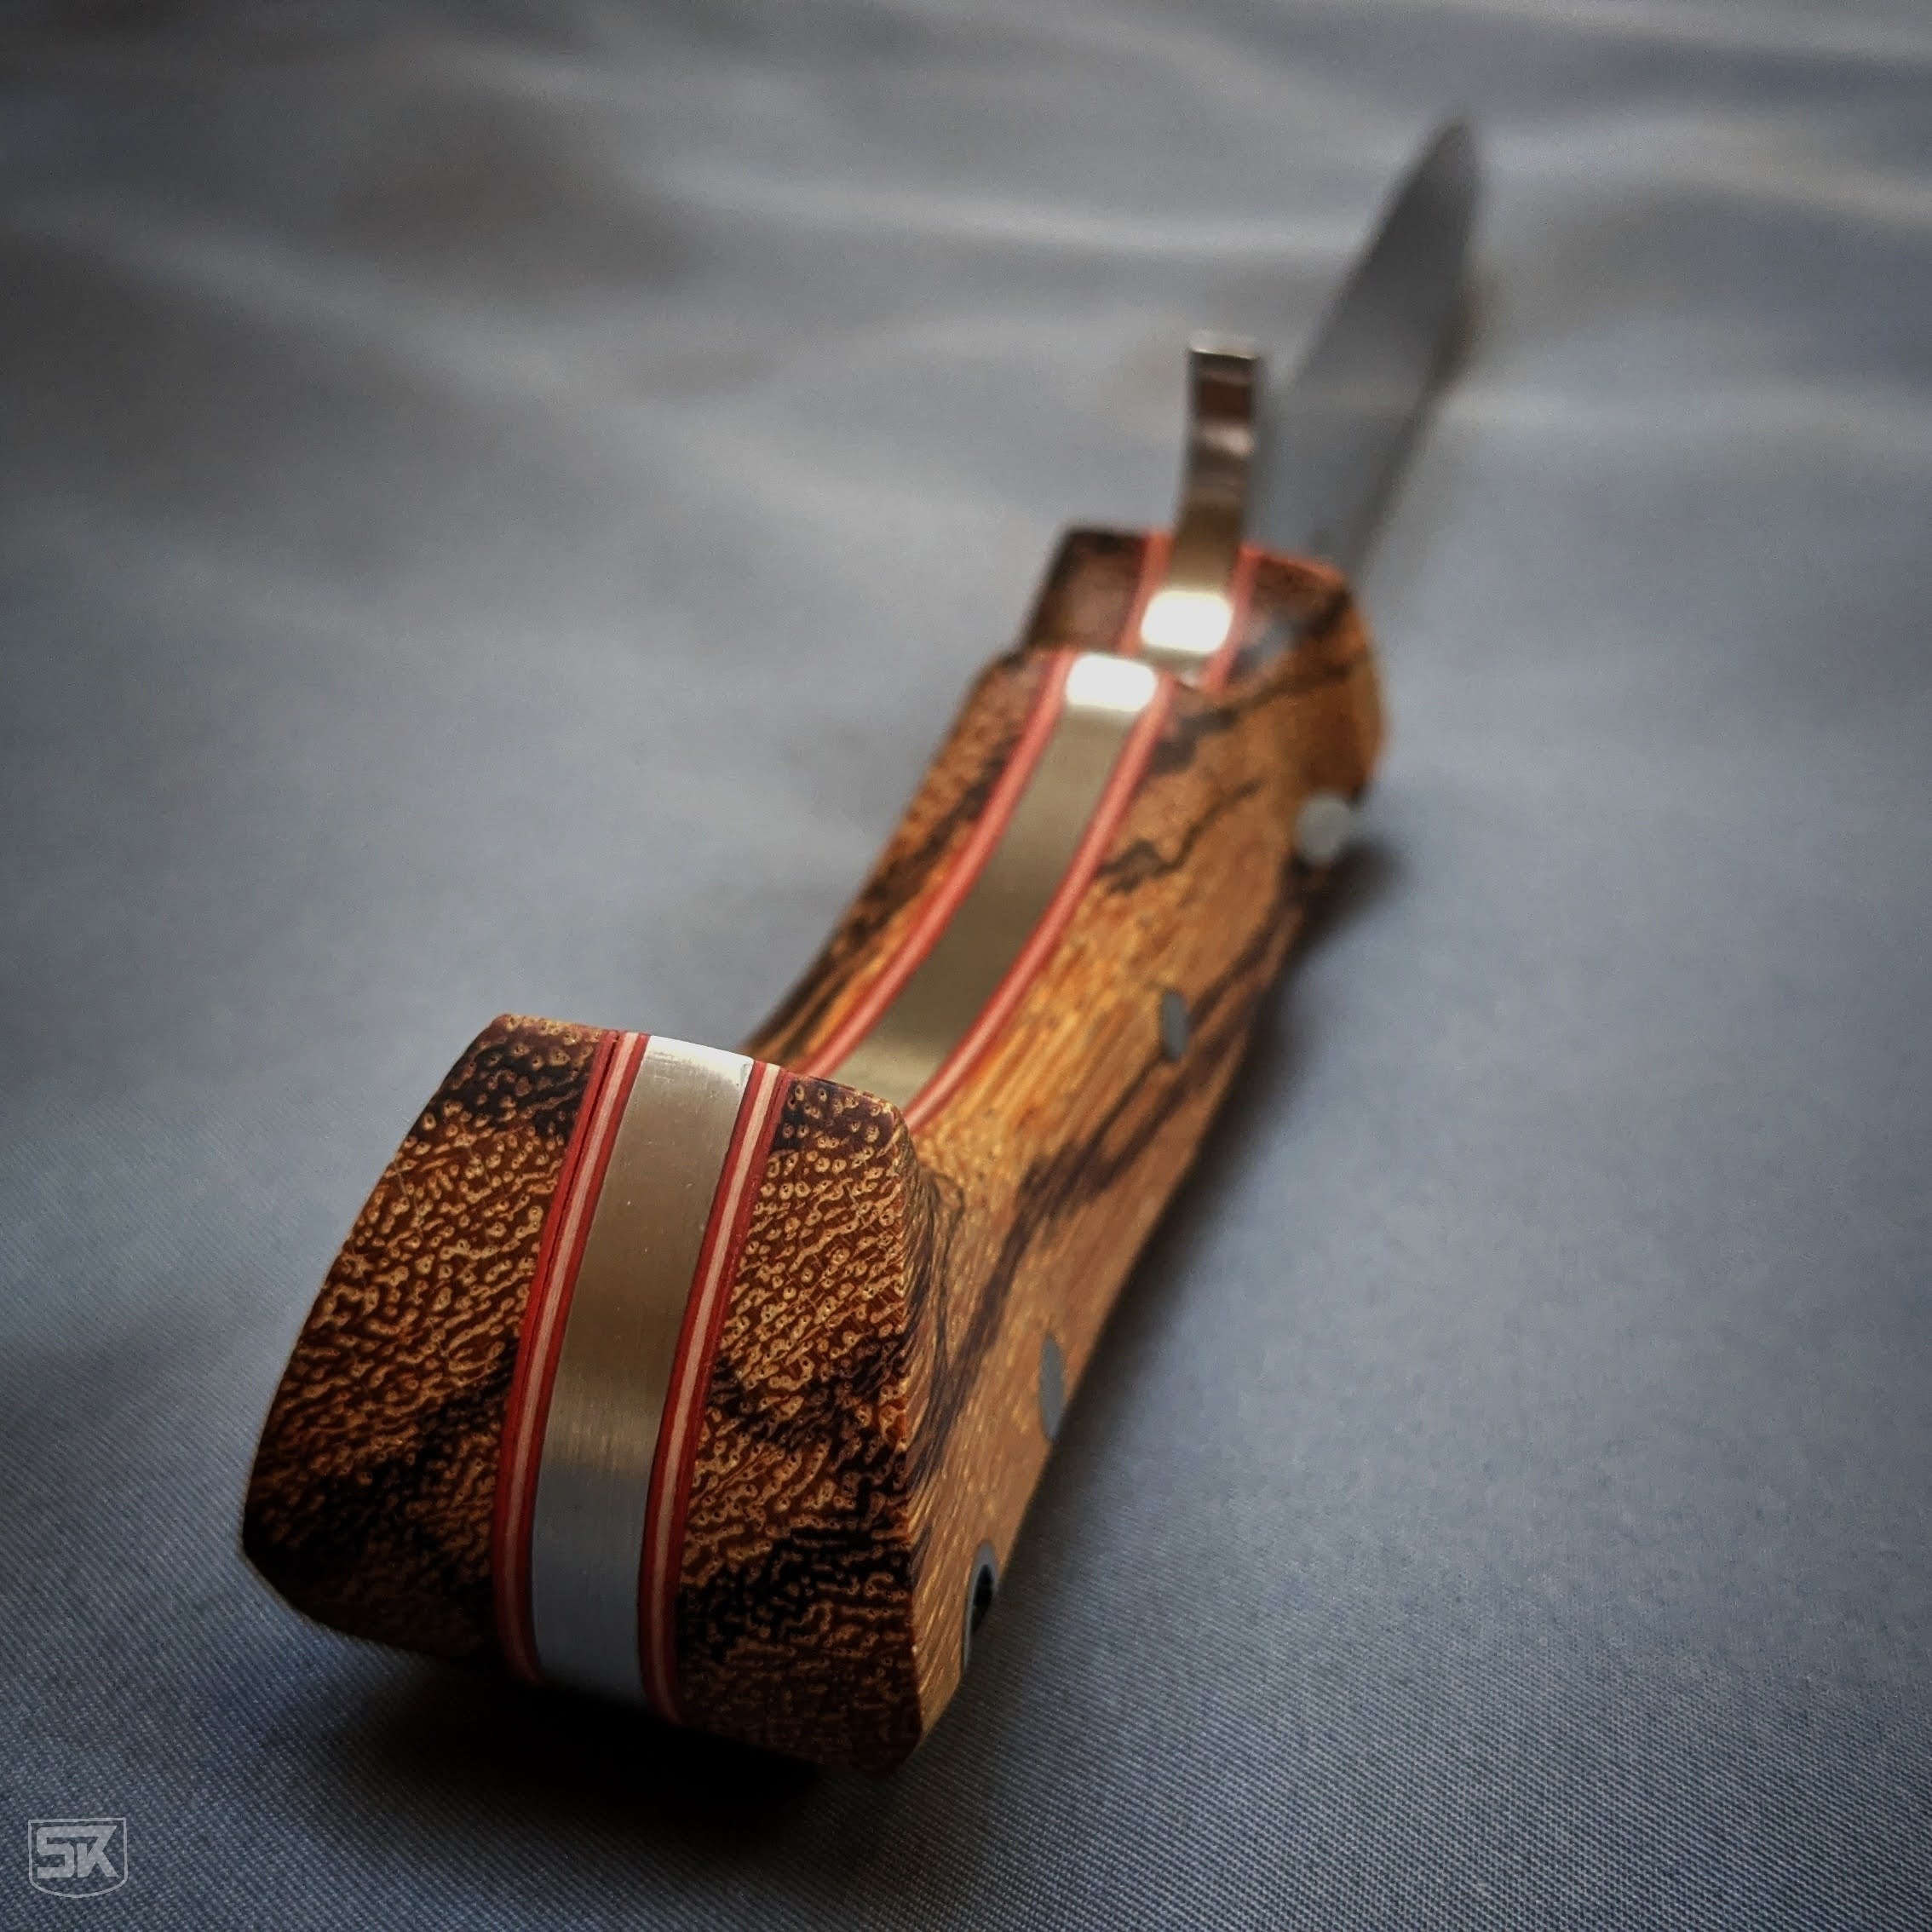
Then I got an order for a knife and suggested this model to my customer and friend. So I got the chance to start from scratch, make another Tigershark knife, and improve. This time I went for a high mirror polish with a mix of scratch pattern finish.
And then – the name-giving handle material serpent wood (with its tiger-like stripes) was out of stock at my usual shops. I waited a bit if it would be back in stock, but when it took too long, I went on to search for other suppliers and found one. I took the chance and also ordered some bamboo for two Asian style kitchen knives (more on that in a later post).
The making of the knife took me a pretty long time with lots of interruptions and private life issues which took me off my progress path. But I came back in my holidays, finished the blade and I am pretty happy with the results.
Next and last step will be making of the leather sheath.
We use cookies on our website to give you the most relevant experience by remembering your preferences and repeat visits. By clicking “Accept”, you consent to the use of ALL the cookies.
This website uses cookies to improve your experience while you navigate through the website. Out of these, the cookies that are categorized as necessary are stored on your browser as they are essential for the working of basic functionalities of the website. We also use third-party cookies that help us analyze and understand how you use this website. These cookies will be stored in your browser only with your consent. You also have the option to opt-out of these cookies. But opting out of some of these cookies may affect your browsing experience.
Necessary cookies are absolutely essential for the website to function properly. These cookies ensure basic functionalities and security features of the website, anonymously.
Cookie
Duration
Description
cookielawinfo-checbox-analytics
11 months
This cookie is set by GDPR Cookie Consent plugin. The cookie is used to store the user consent for the cookies in the category "Analytics".
cookielawinfo-checbox-functional
11 months
The cookie is set by GDPR cookie consent to record the user consent for the cookies in the category "Functional".
cookielawinfo-checbox-others
11 months
This cookie is set by GDPR Cookie Consent plugin. The cookie is used to store the user consent for the cookies in the category "Other.
cookielawinfo-checkbox-necessary
11 months
This cookie is set by GDPR Cookie Consent plugin. The cookies is used to store the user consent for the cookies in the category "Necessary".
cookielawinfo-checkbox-performance
11 months
This cookie is set by GDPR Cookie Consent plugin. The cookie is used to store the user consent for the cookies in the category "Performance".
viewed_cookie_policy
11 months
The cookie is set by the GDPR Cookie Consent plugin and is used to store whether or not user has consented to the use of cookies. It does not store any personal data.
Functional cookies help to perform certain functionalities like sharing the content of the website on social media platforms, collect feedbacks, and other third-party features.
Performance cookies are used to understand and analyze the key performance indexes of the website which helps in delivering a better user experience for the visitors.
Analytical cookies are used to understand how visitors interact with the website. These cookies help provide information on metrics the number of visitors, bounce rate, traffic source, etc.
Advertisement cookies are used to provide visitors with relevant ads and marketing campaigns. These cookies track visitors across websites and collect information to provide customized ads.