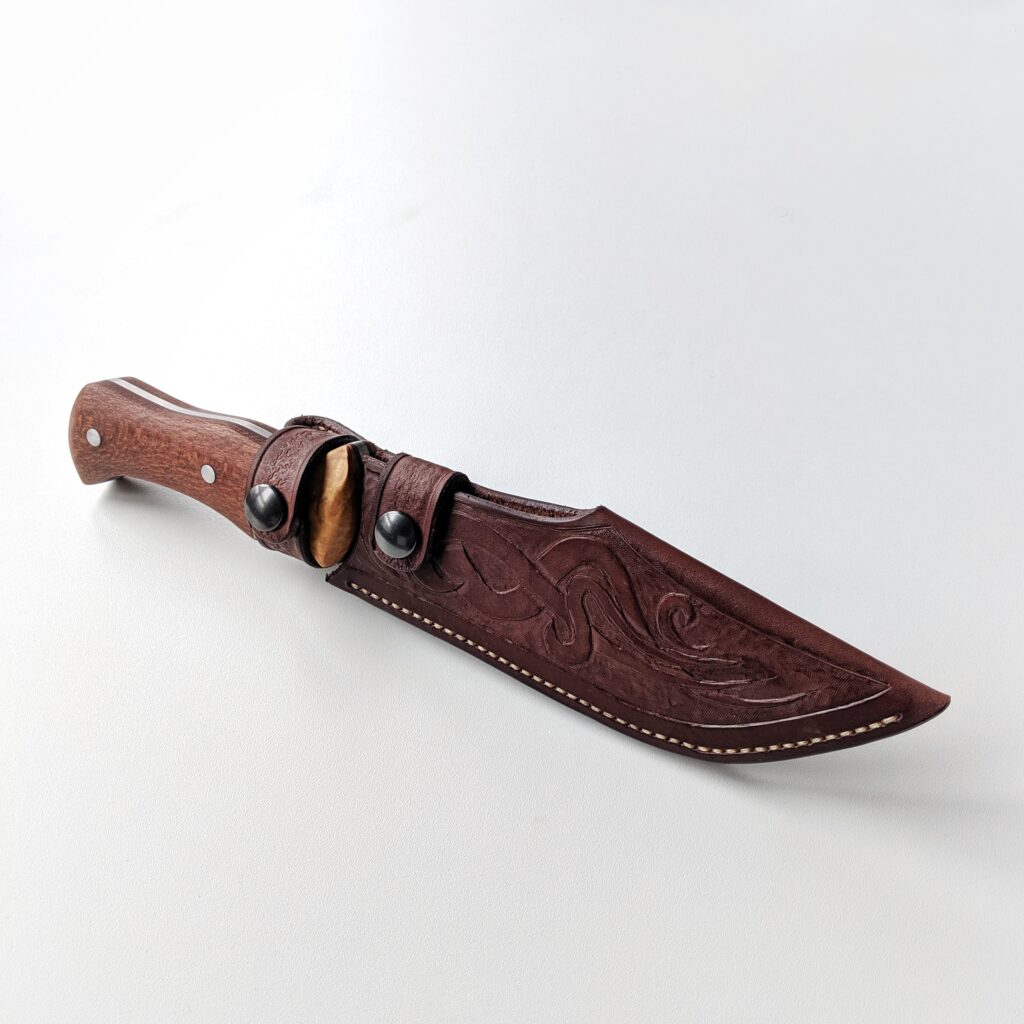
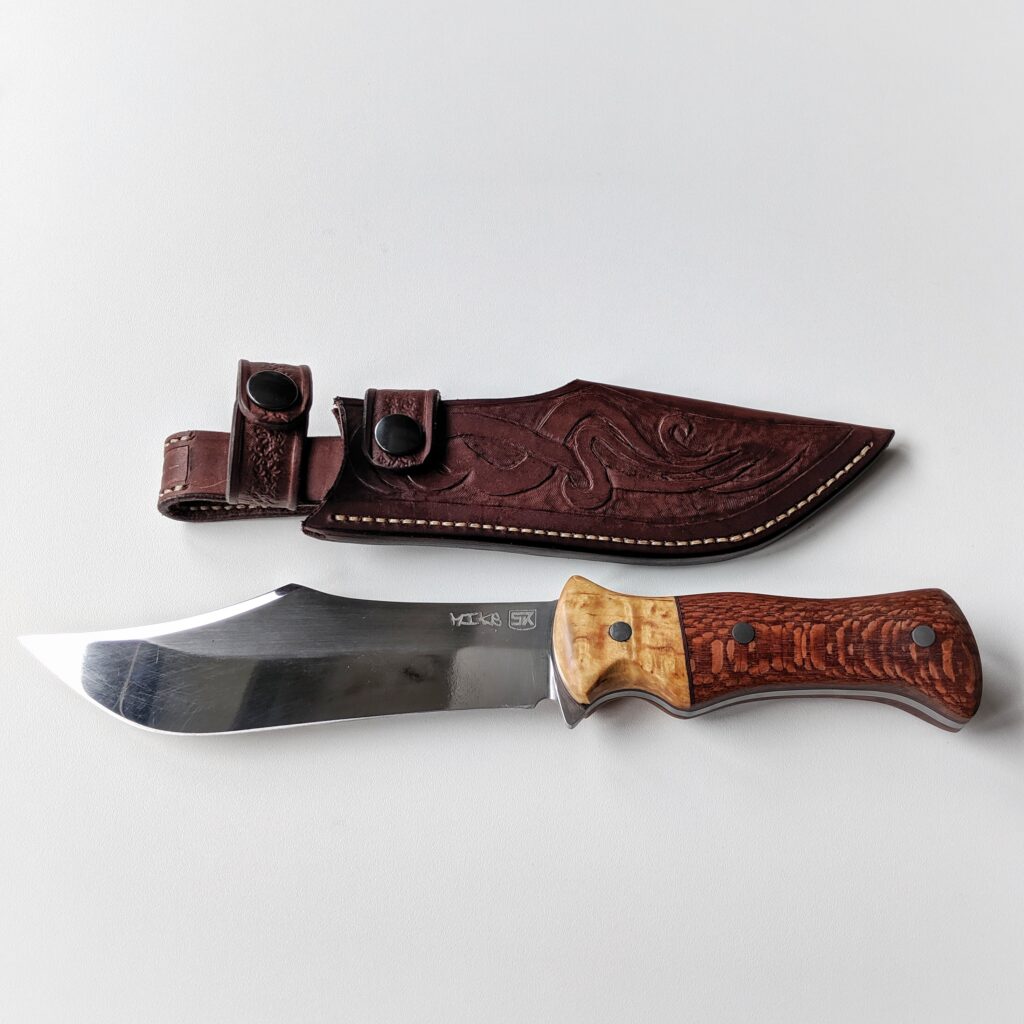
After doing all the leatherwork for the knives of my friends and family and having my Bowie Knife on my table in front of me I felt it was about time to do something for my knife too.
These projects I do for myself are the best chance to try out more things and take higher risks just because if I fail it is just my decision if I am happy with the result anyway or if I have to start over and have all the time for doing so.
I don’t want to dive too deep in the steps of making the sheath, as they are the same as on the other knives before. Most complicated about this type of sheaths I make is the order of the steps – when to dye, when to stitch what, when to glue and when to polish. I lately got a routine so I do not have to overthink the whole process every time.
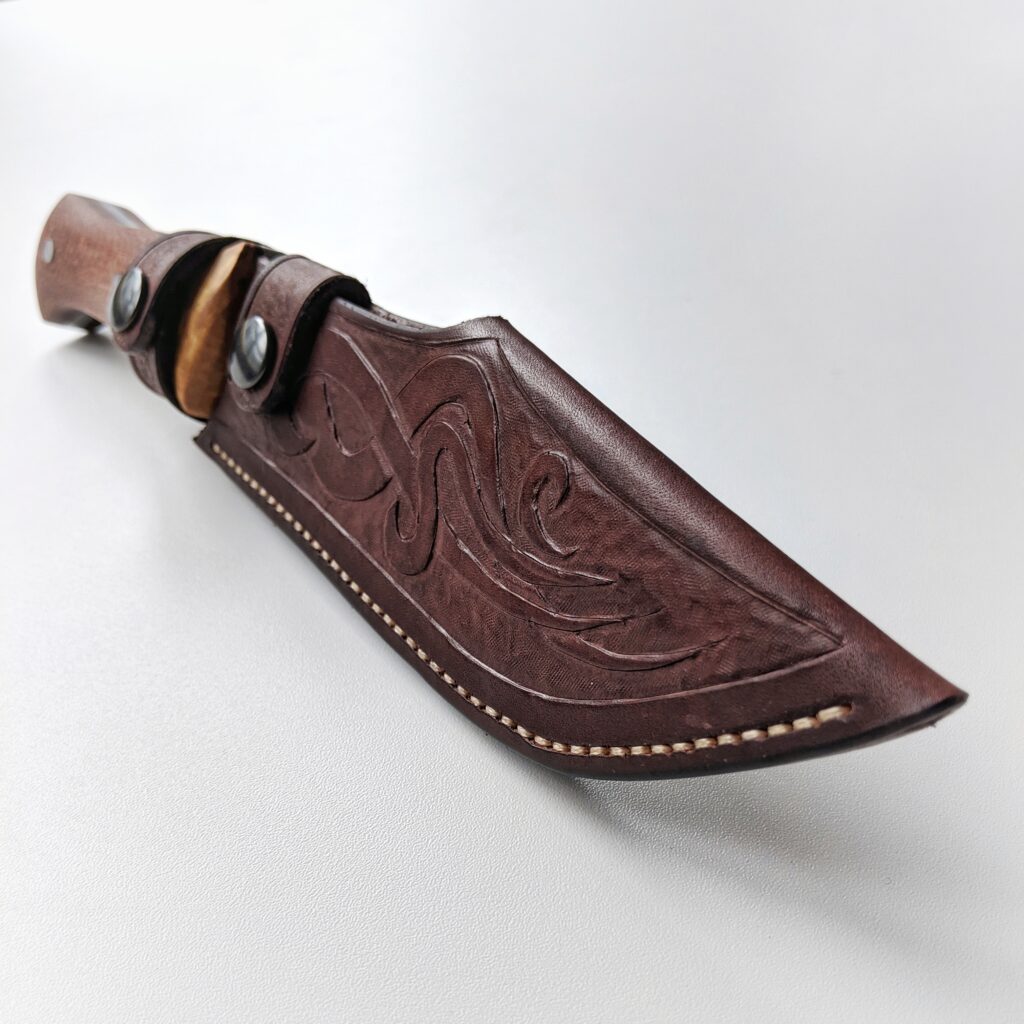
I wanted to try out doing some leather carving where precision really counts just to check the limits. As this would be a sheath for my knife I chose my initials “AB” for the front and some leather punches for the back.
The biggest failure on this project was, that the secondary strap, that closes the open part of the sheath at the spine of the blade, was on the wrong side of the body of the sheath. I just made a mistake while designing the form and cutting it out mirrored. I have made a virtue of necessity and cut it off in favor of a separate strap that I sewed on the back of the sheath together with the belt loop.
As I said on the last post about the sheath for the knife of my brother I liked the result of the decorative stitching and on this new project wanted to take it a step further. I lined every strap and the belt loop with a stitching line that only serves for decorative purposes. What I also wanted to try was using a really white thread to put more contrast on the sheath between the black dye and white stitching. And yes I wanted to dye the sheath black like on the Kukri III.
As if working with steel and wood is not enough I had to learn to work with leather to make appropriate sheaths for my knives. That also means I have to go back and make some sheaths for the knives I already made and as I needed a gift for my brother’s birthday what might be better than making a sheath for him first?
This time I wanted to do some custom carving on the front and I designed some snake/tattoo/tribal style ornaments on my computer. What really worked well was to scan the paper stencil I made for cutting out the paper and use that as a backdrop to get a feeling for the size and what will be visible. As I like to carve in the outside of the blade on the leather there is even less space.
After the black dyed leather of the Kukri III, I decided to go with a dark brown dye on this one. As a contrasting color for the stitching, I chose the very light brown thread again.
The next new thing was some decorative stitching on the sides of the belt loop. It came out perfectly on the brown leather and in the end, I regretted did not do it on the other straps too – next time I will do.
As the blade of the recurved bowie, just like the Kukri, gets wider at the tip of the blade I had to do a folded design again for the sheath, that is open on the straight part of the spine of the blade. There are lots of details to think about when doing such a design but I am happy with the results
What happens is, that if I learn new things this raises the standard I expect of any of my projects and they get more complex. But the final result is always worth it and I like working with leather as much as with wood and steel.
I liked making my Chefs Knife, the Kengata, that is heavily in use in the kitchen of my mother. I talked to her about it and how it performs and she likes its shape, the ergonomy of the handle and the superior sharpness of the blade But for some tasks the Santoku Knife style is a bit too large. Now it was her birthday, so guess what, I made a small Petty Knife.
I chose the same shape as the Kengata Santoku Chefs Knife and scaled it down to the size of a Petty Knife. I chose a 2 mm thin 01 Tool Steel for the knife as for its bigger brother.
The most difficult part was finding the correct name for this knife. I did a lot of research but was not sure what these knives might be called. Finally, it was solved by #followerpower as the Instagramer @customchopshop brought up, that these knives are called “fruit” knives in Japan. So I decided to call this blade “Furutsu”.
The whole conversation is in the comments of this post:
This was the first knife I ground from start to finish on my 2 x 72″ belt grinder. That thing is simply insane, so much power and fun to shred steel on. No wonder the grinder is the heart of a knife makers workshop. The thing is so powerful that it eats away steel so fast that it is much easier to wreck a blade just because you touch the belt with the blade the wrong way just for the blink of an eye.
For the handle, I chose Ziricote again. I did not like the wood too much on the Santoku, just because it is so hard to work into form. It seems to clog up the grinding belts very fast. But as it should suit the Santoku Knife I went for Ziricote again. And I have to admit it is a very beautiful wood.
I just finished my tenth knife and it is here in front of me on my desk together with its polished leather sheath. I started making knives last year in October 2018. For my birthday I got my little belt grinder where I did all ten knives on. I tried out my first knife shape, that I quickly drew on a piece of aluminum, just to get a feeling. This was the birth of my first knife that I know call the Signature blade, my EDC.
I think it is a good time to take a quick look over my shoulder and summarize what happened so far.
The journey and pace is breathtaking on one side and slow and relaxing on the other Side
I learned an insane amount of techniques: cutting steel to the desired shape, hardening and heat-treating it, full and hidden tang constructions, making guards and sub hilt style handles, laminating my own paper micarta, working with expensive woods, glueing everything tightly together, surface finishes of the blades and the handles, making my own handle scales out of wood I salvaged in our garden, leatherworking, saddle-stitching, edge burnishing, and so much more in the details and how to do these things correctly. That is breathtaking and there is so much more to learn.
What was breathtaking too is the work together with my friend and first customer Joe from the US. He helped me push the borders of what I can do and push myself harder to get a better and professional result out of my work. Perfect is just good enough for me. Thank you for that and all your support Joe.
The first ten knives were just a start. The good news is: I get more and more inquiries about custom knives. I am very happy about this and it is an indication that the knives I make are good. Unfortunately what I also learned from that is, that the people have no idea what it means to put 20 or more hours into a single handmade product. Some are really astonished when we start talking about prices. Not bearing in mind I have to pay for materials, tools, and machines and till then I did not even earn any money.
And then there is the slow and relaxing part of knifemaking. Designing blades, putting them in steel, hardening, hand sanding, handle sculpting and finally having a finished product in hand to admire – that is satisfying and a relief. That’s why I don’t let anyone rush me. That is what I love so much.
Another awesome part of this work is the knife community all over the world. I am especially active on my Instagram account and the support and help, the appreciation, the communication with similarly interested people all over the world is a great experience.
My main goal is to keep the passion I feel for what I am doing. To find the perfect balance between pushing myself and enjoying my time.
I am planning to split up my work in the future in two different ways of making business:
My main part of work will be building knives and trying out new things as they cross my path and putting the knives on stock/display.
The other part will be fully customized knives where the buyer has the option to influence every detail – as far as technically possible for me. This
I’m planning a third way – so far just an idea in my head. If I have come to a conclusion, I will publish it here. So stay tuned I like the idea.
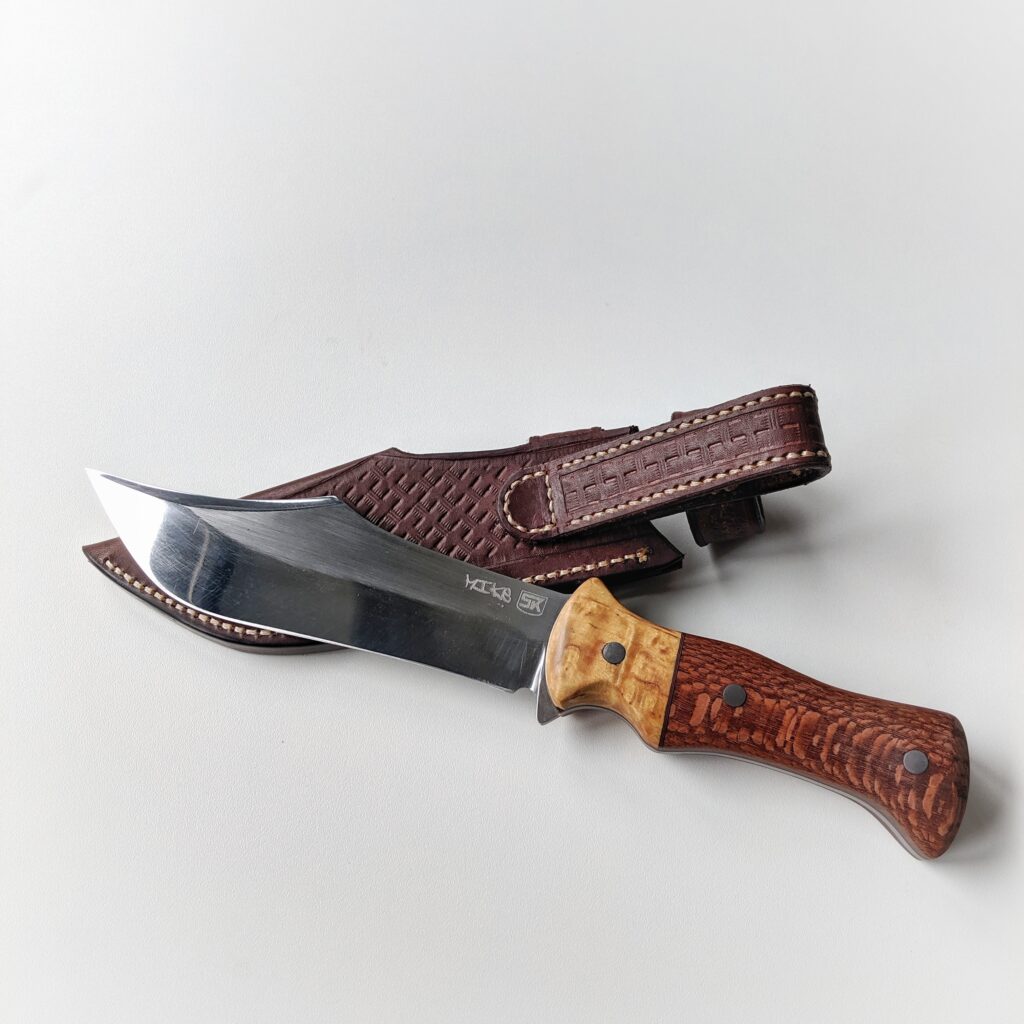
I did a sheath for the Bowie and one for the Hunter, the two knives I made as a Christmas gift for my brother and my father. I used a very thin, sloppy and colored chrome tan leather for them. The next sheath I made was for the JAMZT53 knife. This was also the first time I got the right leather (veg-tan) and did some leather carving and punching to give the sheath a nice looking surface.
Now I just finished the Kukri III and wanted to make a sheath that suits the quality of the knife of my customer and friend Joe. The last time I bought a pretty small piece of leather where the needed sheath parts fit barely on to. Now I looked for a supplier of bigger leather pieces to work with and I found one pretty close to where I live. They are a supplier of professional saddlery stuff. I ordered one square meter and a tube of leather glue.
Unfortunately, the delivery service went pretty rough with my package so that the tube of glue was damaged and some glue spilled into the package. Fortunately, the leather was not affected. But the tube was damaged. I wrote the supplier an E-Mail. Professional as they are I promptly got send a new tube of glue and a kind E-Mail where they said sorry.
This is how it started. Kukris desire a special form for sheaths.
The main problem with sheaths for Kukri knives is that the blade is wider at the tip, so I needed to make a form where the blade would slide in easily but would stay in the sheath safely when carried on the belt. I did a similar form for the Bowie of my brother.
The second important thing to think about ist what to make in which order. If you don’t think that to the end, then you can not fasten for example the push buttons later.
But first I had to do the leather punching. I tried all the steps out by making a little sheath for my first “Signature” knife. I just wanted to make a little different pattern for the Kukri and the sheath would also get dyed black to suit the ebony wood handle.
One thing I learned from the little test sheath was: Put tape on the back of the leather before making the leather wet and punching it. This prevents the leather from stretching. A tip I found in one of the plethoras of YouTube Vids I watched about leather works. I did not do this on the little sheath and It stretched about 2 centimeters (!!!) in one direction.
Black dyed sheath with a punched pattern and attached belt loop.
The second thing I learned: leather dye works great – on hands too. You just have a look at it and everything is stained – and it soaks through sponges in no time. Latex gloves solved the problem. Same for the glue, it is working amazingly. Fortunately, the dye and the glue dry very fast when working with them.
Before stitching anything I glued the leather together and the bonding is very tough. The stitching ads some stability and looks great. I decided to go with accented stitching lines and chose a light color for the thread. I bought a set of hole punches but they won’t work through three layers of this thick leather – so I just used them to mark the holes and used my mini drill to put in the holes one by one.
Another tough task was to fit the push buttons. They are not made for such a thick leather and so I needed to thin the leather down at the spots where I wanted them. I hammered a number of them and they got crooked before I had the right thickness of leather.
I bought some more tools like a stitching pony and an edge-beveler. The first one really helps as a third hand while stitching and the second one makes smooth rounded corners that later help when burnishing the leather edges.
The sheath has a folded part at the top of the wide part of the blade. The little sheath I did first also was folded instead of two parts stitched on top of each other. There I found out that I need to add a bit of space between the front and the back half, as the folding of the thick leather needs a bit of extra material. So I took that into account for the Kukri. That did work better but was still a bit tight. The knife now fits in like into a glove and if the leather stretches over time it will still hold the blade securely. Next time I will add some millimeters extra though.
I watched some tutorials on how to do a correct saddle stitch, not hard to do but it adds some extra durability and it looks so clean. Finally, all came together and I cut the leather straps to the correct length. I burnished all the edges that came together in the last step and treated them with beeswax. Last I treated the whole sheath with fine leather fat and I polished it. So the black color came out even better.
I posted some pictures on my Instagram account @simplyknives and my friend Joe, who I made the knife for, was very happy with the result. That is when all the hard work pays off when you hear and feel the excitement that results out of every minute that is spent into that piece of steel, wood, and leather.
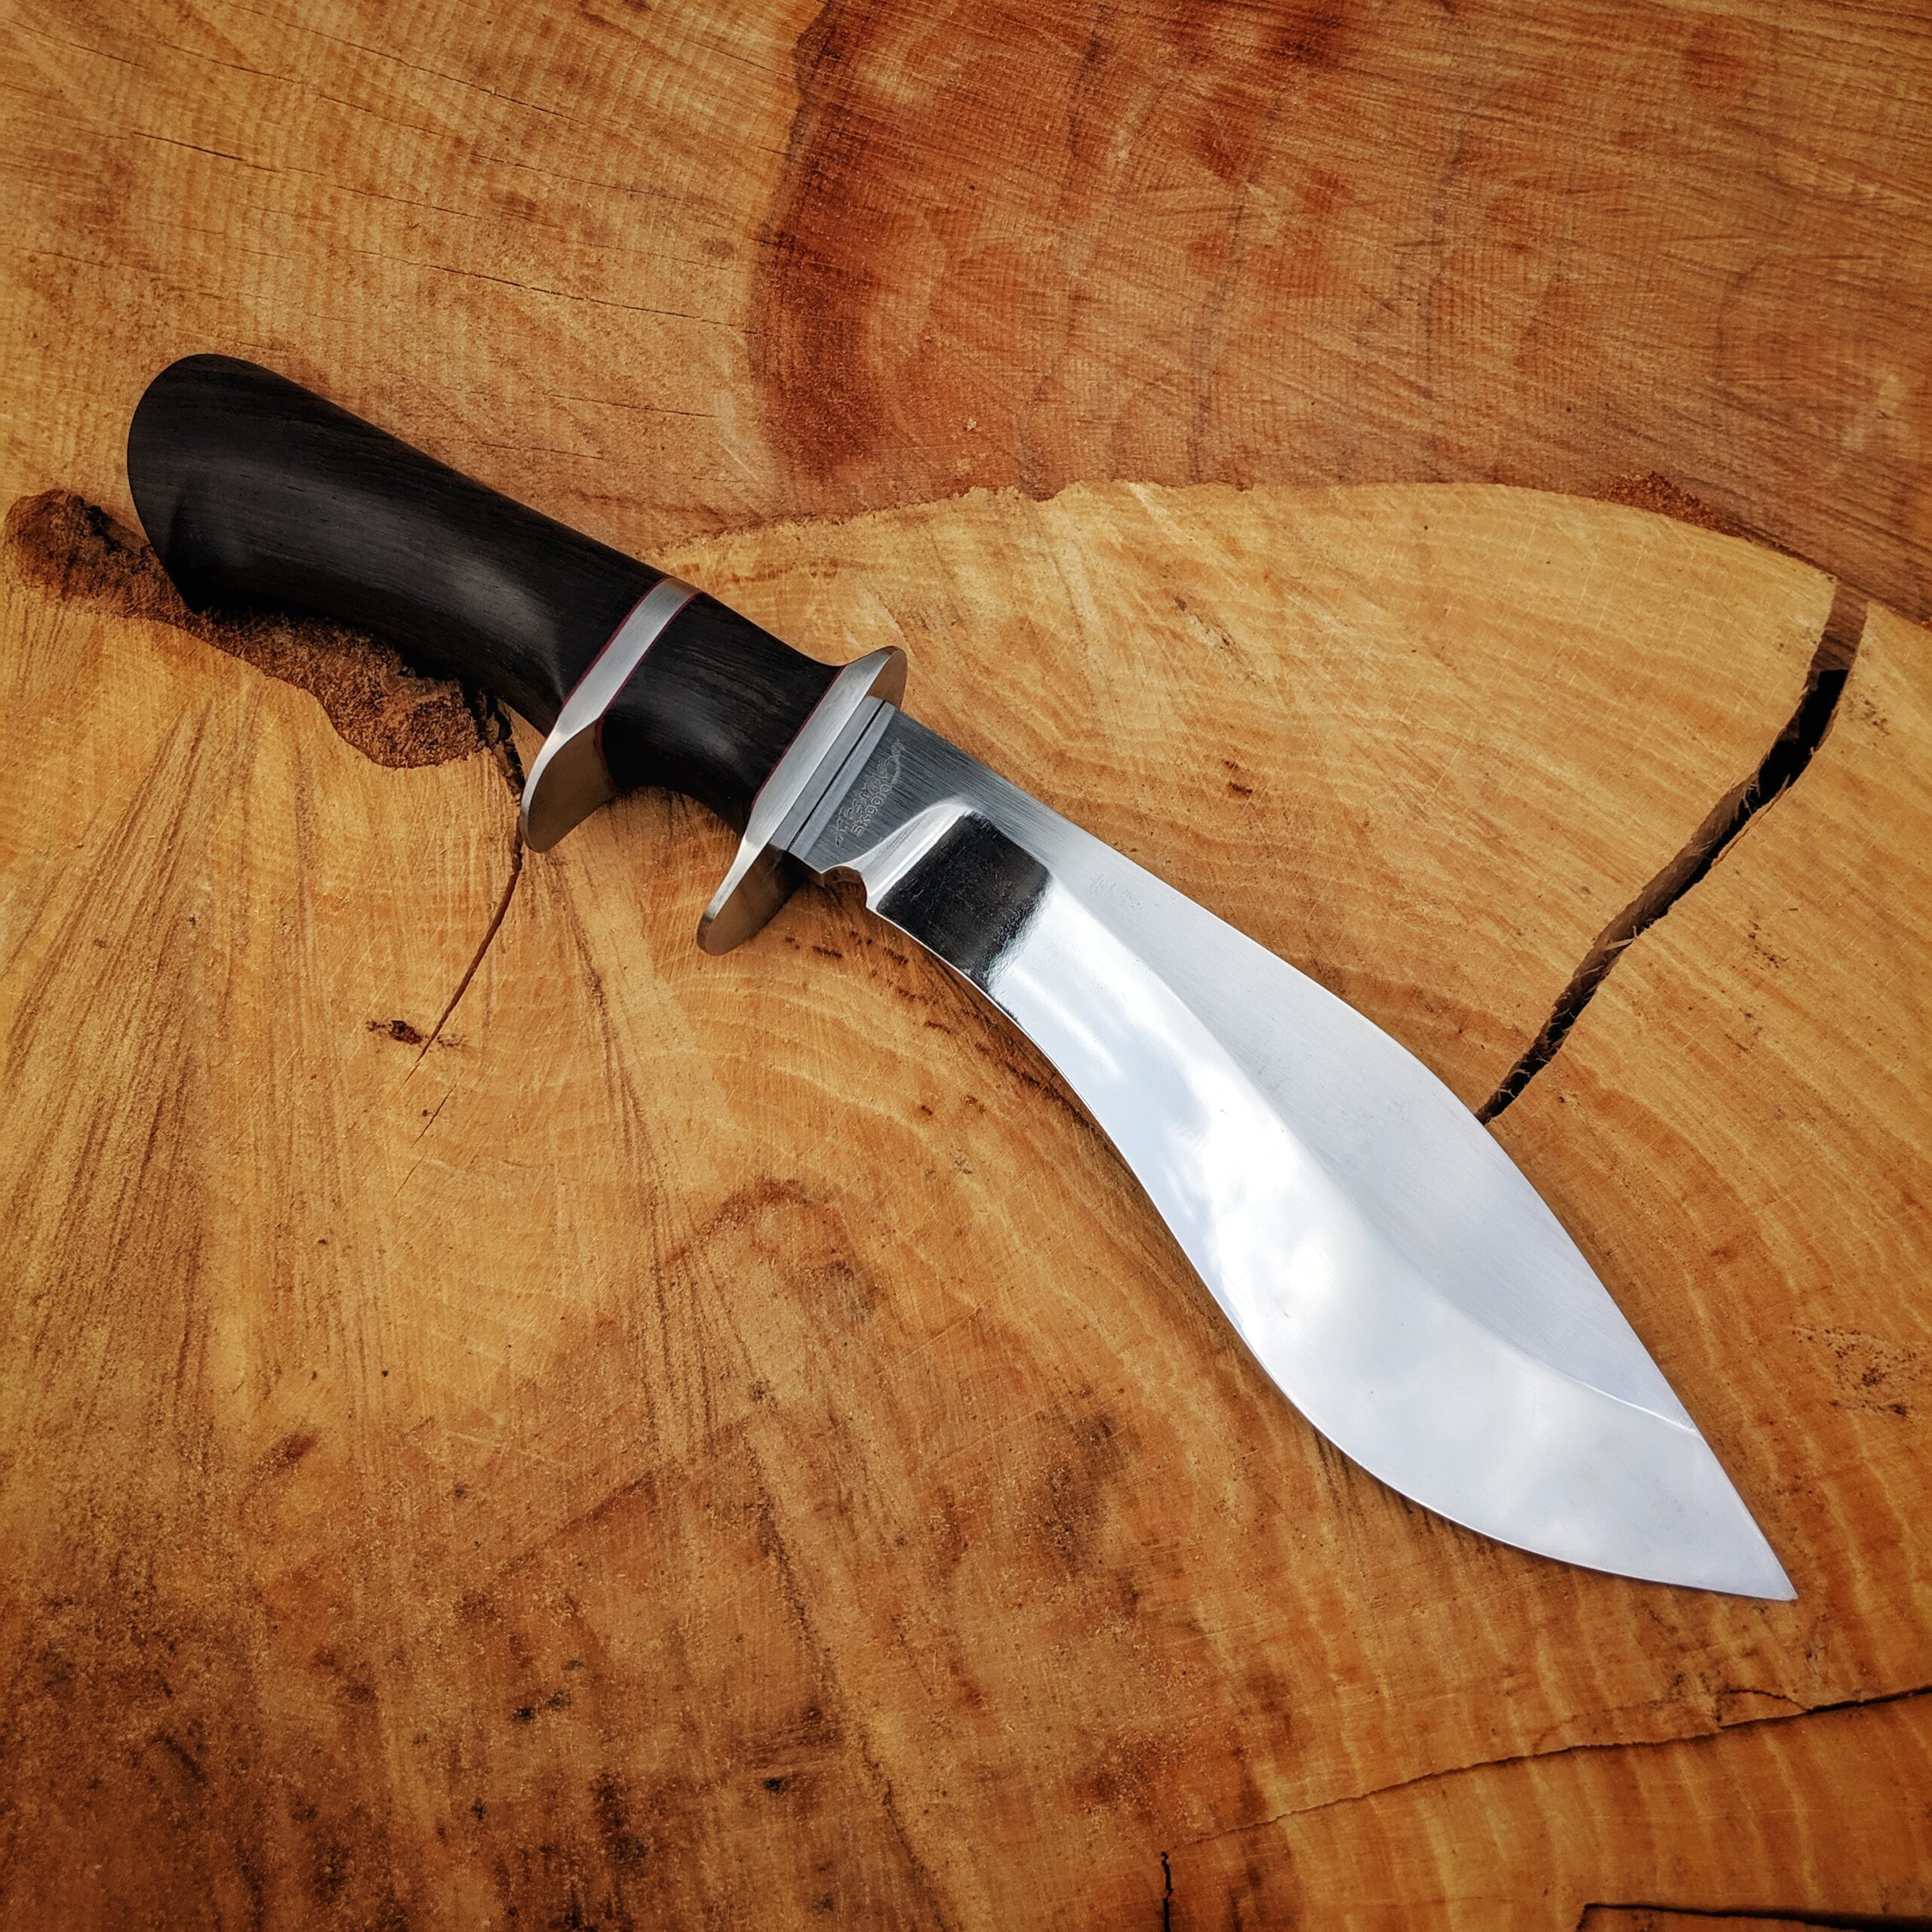
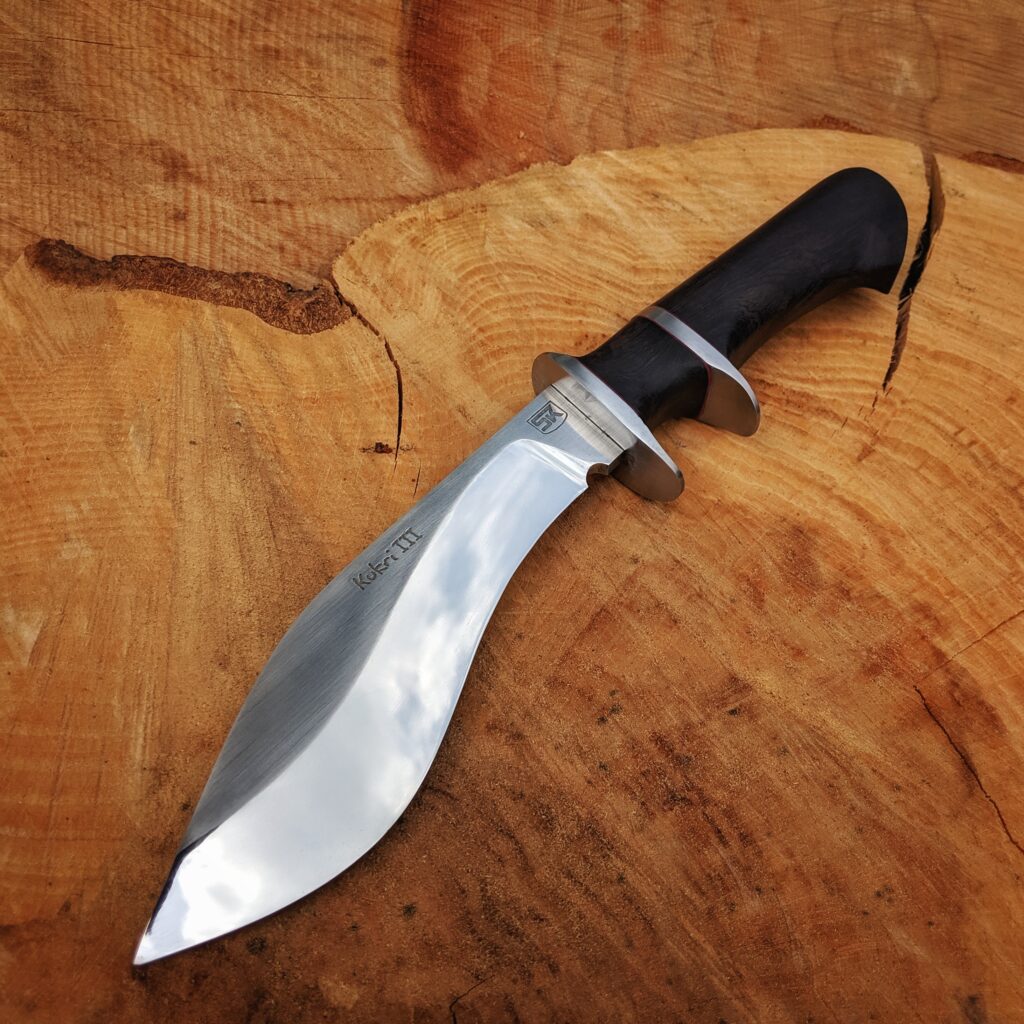
The second knife I ever made was a Kukri and my fascination for these knives is unbroken. Fortunately, I got an order for a Kukri with all the freedom to design and make the knife as I wanted it. That is a lot of trust in my craftmanship from my friend and customer Joe.
So I started designing a western-style crossover between a hidden tang Kukri with a primary guard and secondary guard. I sent the concept drawing to my customer and we agreed on a price so the new project had a go.
One of the most difficult things on a kukri is grinding the complex curves of the bevels. I chose a 5 mm thick 1.2510 steel so there was a lot of material to be removed. I collected the steel dust with some strong magnets and put it in a cup that filled up quite high.
The Kukri III will have a blade that is 1 cm longer than Kukri II and the blade will be a lot thicker. What helped me a lot was, that I found a new type of belts for my little grinder which removes a lot of material and reduces the time I need to grind the blade into shape.
After the bevels where finished, I got my professional belt grinder which would have made things a lot easier – but fortunately, it still helped to give the blade a nice surface finish. I am looking forward to using the grinder for bevels on my next knives.
For the handle, I bought a piece of nice black ebony wood. This wood is so heavy but also so beautiful. The piece seemed to have a perfectly even structure.
Ebony wood for the handle. So heavy but also so beautiful.
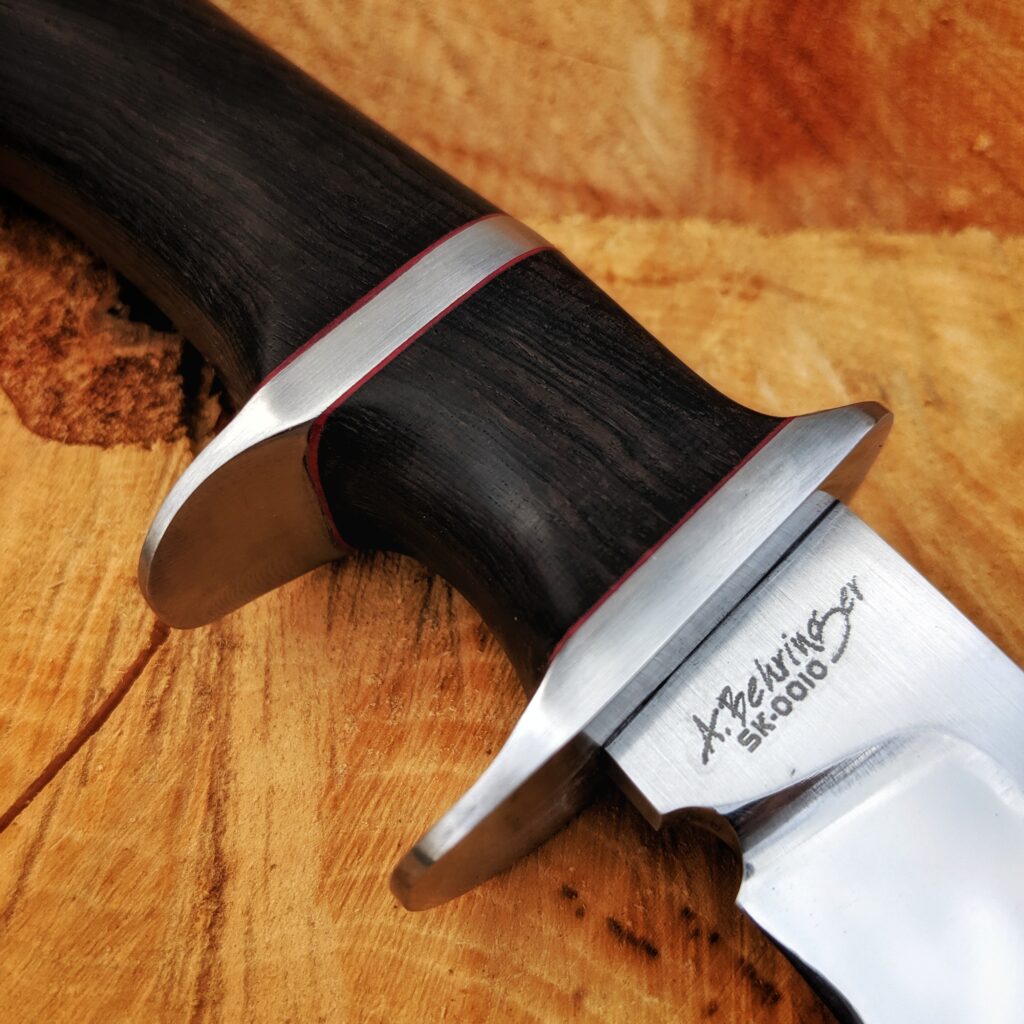
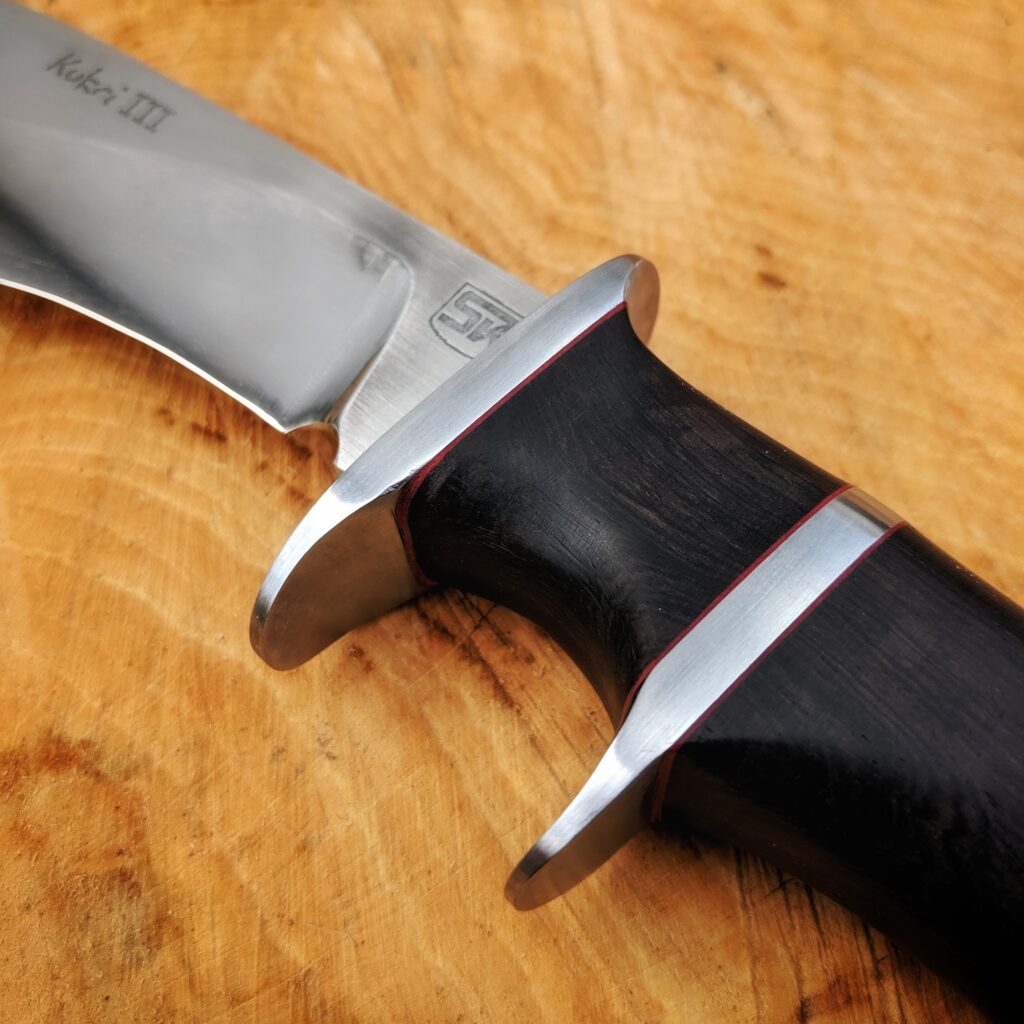
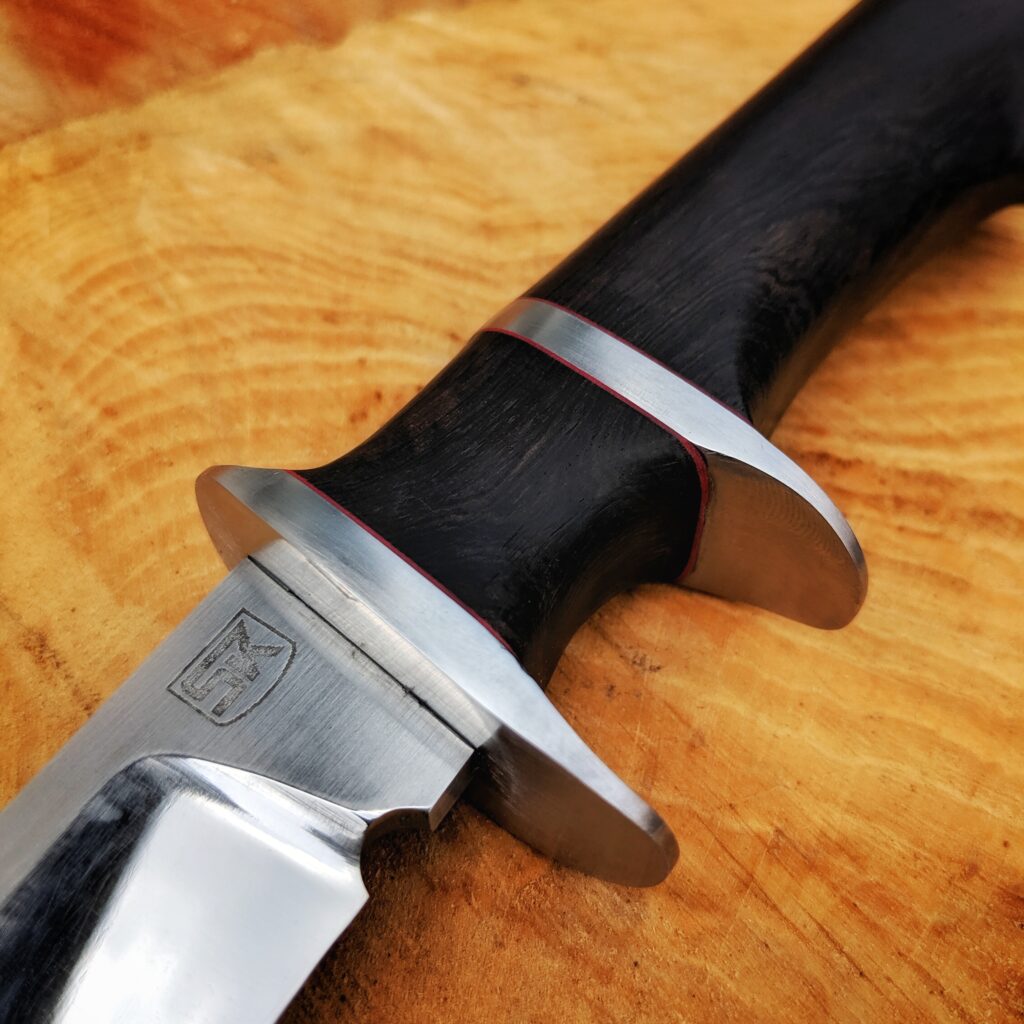
This project took me ages and a lot of work I spent was put into the surface finish of the different parts. If I do such a project it has to be the best I can and I always ad a detail I never did before. Here I added three things, first I never worked with ebony wood – and boy this stuff is hard. Second I did a long secondary guard and I wanted to have red liners on this hidden tang handle.
The surface finish of the blade took me very long. I wanted to have mirror finish bevels and a scratch pattern on the rest of the blade. It was hard to get to the mirror finish and I blame it on the steel that was hard to grind after heat treatment. But finally, I got it to a degree I was happy with. The etching and regrinding of the blade went perfectly.
The second thing that took a long time was the secondary guard. Shaping the handle after putting everything together is pretty hard to do because it is easy to scratch the guard. Then you redo the surface finish of the steel of the guard but have to watch that you do not touch the wood again. In the end, you want a silky touch handle and a guard with a nice scratch pattern. This is also hard to do on the inside of the primary guard, too.
The third thing was the liners. I never did a hidden tang with liners between steel and wood. But the idea of having red lines between the shiny steel and the black wood was intriguing. So I tried and it came out well. By the way: gluing up a handle of four parts – plus laminating the paper micarta in place between the parts was a bit nerve-wracking. And after everything is put together you cannot really see if everything is lined up perfectly. So I used a rubber band as a centerline marker to line things up.
After all, I am pretty happy with the results and I learned a lot. Ebony is an awesome material and gives the knife a very exclusive touch. The next step is the leather sheath, but this will be an extra post…
It all started with my small 762*25 mm belt grinder from a big tool shop chain. It does a good job and the narrow belt has its advantages on blades with lots of curves. The disadvantages are a low power and the lack of precision of the plate and hard to manage belt guidance.
I had seen the machines that are used by American knifemakers on the internet. Typical is the open style without covers which would obstruct the changing of the belt and the easy access to slack parts of the belt. Unfortunately, the open style makes it difficult with European laws to get the needed safety certifications. Without the CE marking you are not allowed to sell a machine in the EU.
This is when I heard of the belt grinders of Batko Bandschuurmachines from our neighbor country Netherlands. He has solved the European requirements and has a portfolio of 4 different models. I looked through every machine they offer and found out the Batko 1400XL would be perfect. It is the second-largest model.
Batko 1400XL with Klingspor CS 710 XF belt
I contacted Jac Nijskens, the head of the company by eMail and asked him tons of questions and how the different options could be configured. He sent me a quote for my dream machine and I was totally amazed at the fair price.
As it was just an hour’s drive I totally wanted to pick up the machine personally. This way I could also have a look at further options like the small roller set and talk to Jac personally.
Unfortunately, he did not have a machine ready on Saturday that week. No wonder when you have a look at the high quality of the machines and as he might be the only dealer around to have this type of machines. So we agreed on Saturday the week after.
Wednesday the next week he mailed that he might not have a machine for me again and as the third weekend was already blocked on my side I would have to wait at least two more weeks. First of all, I was sad because I really wanted to get my hand on one of these professional grinders and second I had a project on my table for a friend in the US where the machine would have been handy for.
I mailed back that if he would still have a grinder ready on Saturday he could call me and I would jump right into my car. And what should I say? He told me on Friday he would have my baby ready and that I could come to NL at 12:00 o’clock.
I took my whole family with me for that short trip to NL. We arrived at Beesel at 11:20 and used the spare time to take a turn around the beautiful town before I called Jac.
Jac is a great guy who knows everything about belt grinders. He showed me how to use the grinder, handle the belts and we talked about his and my business. These machines are massively built for generations to come and exactly that is his claim.
I felt like a nine-year-old in a candy shop. We unpacked the machine and he taught me about every detail. I decided to take the set of small rolls and some grinding belts too. The room with every kind of grinding belts alone makes every knifemaker smile.
Back at home I put everything together, threw on a 60 grit belt on the wheels and tried some grinding on a piece of scrap metal and what should I say – this beast shreds through steel like a beast. That thing is a must-have for serious knife making. I am more than happy with the machine. When you talk to Jac, tell him I sent you.
What is next? I will have to attach the grinder to the table, after that I will put a bucket with water below the plate to catch sparks and dust and to cool down the blades while grinding. The small grinder will stay in my workshop for special purposes and grinding the knives handles.
I always planned to make a kitchen knife. Not just because I like cooking myself and I do hate dull knives while cutting things. But I like to make things that can actually be used on a daily basis.
I use my Meat Cleaver: the Butcher and I love how sharp it is when cutting meat. But it is a bit chunky, has a short blade and most of all the blade is absolutely straight, that is not always ideal for cutting (and the next cleaver will have a slight radius to the blade).
“Kengata” etching on the blade
I looked for inspiration on Instagram and the web and soon found Japanese style knives. The ones of the widest usage spectrum are called Santoku – which translates into “three virtues” or “three uses” and is a general-purpose knife form. The word refers to the wide variety of ingredients that a Santoku knife can handle: meat, fish, and vegetables.
There are also different variants of Santoku blades and the ones I liked the most can be found if you look up Kangata Santoku in your favorite search engine. I could not find out what Kengata means.
I designed the blade a bit different, as I always love to add a bit of my own style – probably give it a bit of a western touch.
I had bought 2 mm thin 1.2510 (01 Tool Steel) for this purpose as I wanted a thinner blade than I did for my outdoor knives. And I wanted to give this steel a try.
My “improved” etching machine
Before etching my maker’s mark I improved my self made etching machine with a better clamp and a nice handle for the cloth. Now that works much better and cleaner. The first lesson I learned on this project: Make sure the stencil is not upside down or it makes you look silly. At least I noticed that mistake so early that I could grind away the marking before it was too deep in the steel and do it again.
The second lesson I learned: Ziricote wood is HARD. I chose it for the handle because of the dark color. It has a strong tendency to crack and I had any new belts for my grinder so I had a hard time bringing the handle into shape. I used a metal file I normally use for the blades. I think this is also the last time I use Ziricote wood.
Handle in final shape and freshly treated with linseed oil varnish
Finally, I got the handle to the desired shape. I wanted to give the heel a distinct look and also add some ergonomics to the feel of the grip. In the end, I am happy with the result. The knife will be a gift but I will make this model again – at least one for my own kitchen…
Can there be something like a kind of erotic in a material like steel? I think I felt something like that when I received my latest steel delivery.
I got in contact with a local dealer where I can get higher quality steel with a nice pre ground surface finish. They are specialized in tool steel and offer every useful dimension I might need for making knives. Every piece is produced with a high precision and professionality I did not find at any other online retailer for knifemaking supplies.
The moment I talked about at the top was, when i received the package, tightly wrapped cardboard, tape and plastic straps. I pulled out the steel, additionally wrapped in bubble wrap. And then came the steel…
The steel was clad in brown waxed packaging paper and you could already smell the oil they used on the steel to avoid rust. The oil had soaked a bit through the paper – just enough to make it darker in some spots like when you have butter on paper. Unwrapping this brown paper and finding this shiny and precision ground steel and smelling the oil was so satisfying, that I wanted to immediately head to my workshop and start my next project.
It is a bit strange how the perception of the material changes during the building process. Now it is just a rectangular piece of hard and shiny metal. A beautiful raw material waiting to be transformed. Then you bring it to its shape an you see the beauty of the final product emerge step by step. Finally you hold something in your hand where you can not imagine that it started as just a block of metal. You feel the ergonomic handle, see the beauty of the wood grain and you get a feeling for the balance of the knife, the sharpness and the feeling that you built a faithful companion for somebody who cherishes it.
It happened some weeks ago. When I woke up and checked my Instagram, I found a message from a knife collector from the USA. I answered and we started a conversation about my work which soon led to my last work, the Glücklich Gärtnern knife. He asked for the price and caught me completely off guard. Yes, I always planned to sell my knives one day – but this fast?! I was totally thrilled to hear that he was seriously considering to buy this knife model – that was initially intended for a cooperation with the german gardening blog Glücklich Gärtnern. But I was more than happy to make this knife again.
As english is not my native language (as you probably guessed by now), I feared to loose him as I actually wanted to say that I found it awesome, that he was interested in my work but instead said I was “amazed” which sounded kind of negative. But I managed to explain that when I realized something went in the wrong direction 🙂
For the price I had to approximately calculate the materials and hours of work I would put into this knife. I just had finished the original knife and used this as a reference. What I also calculated was, that I am new to knife making and don’t have years of experience in making knives. So there might be some small mistakes in the end product.
We agreed upon the price and we also talked about adding a simple leather sheath, just for transportation purposes. I had just done two very simple sheaths for the knives I gave away to my brother and father for christmas. I had used a very thin leather type and stitched it with a sewing machine.
What I did not calculate was my drive to make everything perfect. I was so thrilled to have somebody so excited about my work that I was paying very much attention to every detail. Also I wanted to outdo the original knife and decided to polish the blade to a mirror finish. This is why I reground the blade three times back to a 120 grit because I found small scratches in the steel when I started polishing it.
Some of the leather tools I bought or made myself
Another decision I made was to craft a beautiful sheath instead of the simple ones I did before. I bought the right leather and the tools for carving, stamping an stitching the leather. A new craft to learn and the perfect chance.
I am very happy with the results of knife and sheath and most of all it was an awesome time working together with the customer – now a friend. I shared many steps of my progress with him over Instagram. His encouraging feedback drove me forward and pushed me far beyond my former limits.
We use cookies on our website to give you the most relevant experience by remembering your preferences and repeat visits. By clicking “Accept”, you consent to the use of ALL the cookies.
This website uses cookies to improve your experience while you navigate through the website. Out of these, the cookies that are categorized as necessary are stored on your browser as they are essential for the working of basic functionalities of the website. We also use third-party cookies that help us analyze and understand how you use this website. These cookies will be stored in your browser only with your consent. You also have the option to opt-out of these cookies. But opting out of some of these cookies may affect your browsing experience.
Necessary cookies are absolutely essential for the website to function properly. These cookies ensure basic functionalities and security features of the website, anonymously.
Cookie
Duration
Description
cookielawinfo-checbox-analytics
11 months
This cookie is set by GDPR Cookie Consent plugin. The cookie is used to store the user consent for the cookies in the category "Analytics".
cookielawinfo-checbox-functional
11 months
The cookie is set by GDPR cookie consent to record the user consent for the cookies in the category "Functional".
cookielawinfo-checbox-others
11 months
This cookie is set by GDPR Cookie Consent plugin. The cookie is used to store the user consent for the cookies in the category "Other.
cookielawinfo-checkbox-necessary
11 months
This cookie is set by GDPR Cookie Consent plugin. The cookies is used to store the user consent for the cookies in the category "Necessary".
cookielawinfo-checkbox-performance
11 months
This cookie is set by GDPR Cookie Consent plugin. The cookie is used to store the user consent for the cookies in the category "Performance".
viewed_cookie_policy
11 months
The cookie is set by the GDPR Cookie Consent plugin and is used to store whether or not user has consented to the use of cookies. It does not store any personal data.
Functional cookies help to perform certain functionalities like sharing the content of the website on social media platforms, collect feedbacks, and other third-party features.
Performance cookies are used to understand and analyze the key performance indexes of the website which helps in delivering a better user experience for the visitors.
Analytical cookies are used to understand how visitors interact with the website. These cookies help provide information on metrics the number of visitors, bounce rate, traffic source, etc.
Advertisement cookies are used to provide visitors with relevant ads and marketing campaigns. These cookies track visitors across websites and collect information to provide customized ads.